基本语法
main.go
1 | package main |
Template包
1 |
|

1 | package main |
1 |
|
要谈 gopls,得先聊聊 LSP。
LSP,全称 Language Server Protocol,即语言服务器协议,这是微软创建的一个协议(目前已有 Codenvy,Red Hat 和 Sourcegraph 等公司一起支持它的发展)。定义了在编辑器或 IDE 中与语言服务器之间使用的协议,该语言服务器提供诸如自动完成,转到定义,查找所有引用等语言功能。语言服务器索引格式(LSIF,其发音类似于“ else if”)的目标是支持开发工具或 Web UI 中的富代码导航,而不需要源代码的本地副本。
目前该协议得到了编辑器和语言社区的广泛支持。
LSP 的官方网站:https://microsoft.github.io/language-server-protocol/,GitHub 地址:https://github.com/Microsoft/language-server-protocol。目前最新版本(2020-09-06):3.15。
为编程语言添加诸如自动完成、转到定义或鼠标悬停出现文档之类的功能需要付出大量的努力。传统上,这项工作必须为每个开发工具重复进行,因为每个工具为实现相同的特性提供不同的 api。
语言服务器(Language Server)旨在提供特定语言的智能功能,并通过支持进程间通讯协议与开发工具进行通信。
语言服务器协议(LSP)背后的思想是为这些服务器和开发工具的通信方式提供标准化协议支持。通过这种方式,可以在多个开发工具中重用单个 Language Server,而这些工具反过来可以用最少的工作支持多种语言。
例如,之前需要为 VSCode 构建 Go 插件、为 Sublime Text 构建 Go 插件、为 Vim 构建 Go 插件、为 Sourcegraph 构建 Go 插件,很多重复的工作。现在,对于每种语言,LSP 允许语言社区将精力集中在一个高性能语言服务器上,这个服务器可以提供代码完成,悬停文档提示、跳转到定义、查找引用等功能,而编辑器和客户端社区可以专注于构建一个单一的、高性能的、直观的和惯用的扩展,这个扩展可以与任何语言服务器通信,即时提供深入的语言支持。
LSP 是语言提供商和工具供应商的双赢!
语言服务器(Language Server)作为单独的进程运行,开发工具在 LSP 基础上通过 JSON-RPC 与服务器通信。下面是一个开发工具和语言服务器在进行编辑时如何通信的例子: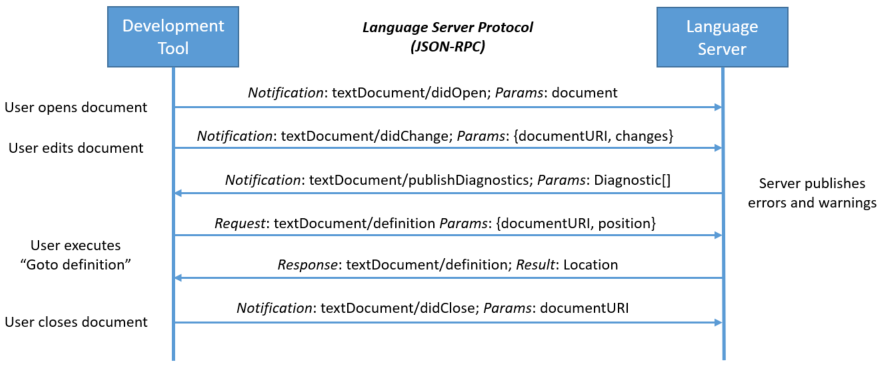
图片来自 LSP 官网,演示了协议如何在文档引用(uri)和文档位置级别与语言服务器通信。这些数据类型与编程语言无关,适用于所有编程语言。
The user opens a file (referred to as a document) in the tool: The tool notifies the language server that a document is open (‘textDocument/didOpen’). From now on, the truth about the contents of the document is no longer on the file system but kept by the tool in memory. The contents now has to be synchronized between the tool and the language server.
The user makes edits: The tool notifies the server about the document change (‘textDocument/didChange’) and the language representation of the document is updated by the language server. As this happens, the language server analyses this information and notifies the tool with the detected errors and warnings (‘textDocument/publishDiagnostics’).
The user executes “Go to Definition” on a symbol of an open document: The tool sends a ‘textDocument/definition’ request with two parameters: (1) the document URI and (2) the text position from where the ‘Go to Definition’ request was initiated to the server. The server responds with the document URI and the position of the symbol’s definition inside the document.
The user closes the document (file): A ‘textDocument/didClose’ notification is sent from the tool informing the language server that the document is now no longer in memory. The current contents are now up to date on the file system.
以下是在 C++ 文档中针对“Go to Definition”请求在开发工具和语言服务器之间传输的有效负载。
这是请求:
1 | { |
这是响应:
1 | { |
经过上面对 LSP 的介绍,你应该猜到 gopls(发音为“Go please”) 是什么了吧?!没错,gopls是由 Go 团队开发的官方 Go 语言服务器。它为任何 LSP 兼容的编辑器提供 IDE 功能。
在 LSP 官网列出了相关的实现,包括三个部分。
其中 Go 语言的实现有两个:(Sourcegraph 的不再维护,因为集中维护一个会更好)
gopls 是 Go 官方维护的、对 LSP 的实现,即一个 Go 语言的官方 Language Server。
包括 VSCode、Sublime Text、Atom、Emacs、Vim 和 Eclipse 等很多开发工具。在上文提到的两个网站都有列出。
为了方便开发,还有一些 LSP 的 SDK 可以使用。具体可以查看:https://microsoft.github.io/language-server-protocol/implementors/sdks/。
首先说明下,目前 gopls 还不是稳定版本,处于 alpha 状态,所以 VSCode 默认没有启用它。项目地址:https://github.com/golang/tools/tree/master/gopls。
目前 gopls 支持的特性包括:
目前已知存在如下的问题:
当前 gopls 的工作重点是确保稳定性(期待发布 1.0 版本),之前一直受诟骂的是资源占用,目前已经好太多了。
有如下编辑器支持 gopls,你可以根据自己喜爱的编辑器查看相应的安装、配置说明。
| 名称 | 描述 | 地址 |
|---|---|---|
| FileZilla | 免费、开源的FTP客户端 | https://filezilla-project.org/download.php |
采用$0,$1,$2..等方式获取脚本命令行传入的参数,值得注意的是,$0获取到的是脚本路径以及脚本名,后面按顺序获取参数,当参数超过10个时(包括10个),需要使用${10},${11}….才能获取到参数,但是一般很少会超过10个参数的情况。
1 | !/bin/bash |
在shell中执行脚本,结果如下
1 | >./test.sh a b c d e f g h i j |
可以看到${10}正确读取到了第十个参数,而$10被分成$1读取到第一个参数a然后拼接字符串0,于是输出a0。
优点:获取参数更容易,执行脚本时需要的输入少
缺点:必须按照顺序输入参数,如果中间漏写则参数对应就会错误
语法格式:getopts [option[:]] [DESCPRITION] VARIABLE
option:表示为某个脚本可以使用的选项
“:”:如果某个选项(option)后面出现了冒号(”:”),则表示这个选项后面可以接参数(即一段描述信息DESCPRITION)
VARIABLE:表示将某个选项保存在变量VARIABLE中
1 | while getopts ":a:b:c:" opt |
用一个while循环加case分支获取不同参数,:a:b:c相当于定义参数的变量名,有时候可能会有未知参数,所以增加一个?的分支。
在shell中执行脚本,结果如下
1 | >./test.sh -a 1 -b 2 -c 3 |
优点:由于使用了-a加参数值的方式进行一一匹配,所以不会参数匹配错误,同时也可以缺省参数,并不会导致参数错误,同时也便于后期参数的扩展和移植
缺点:脚本执行时参数需要的输入会增多
想要知道"www.baidu.com"的变量net的长度十分简单,通过$
应用旧访问地址:http://192.168.1.1:6622/xxxx
优点:方便、快捷,删除原先端口绑定的HTTP,添加新的HTTPS协议至原端口。
缺点:如果应用程序在很多地方使用,协议升级后,原地址:http://192.168.1.1:6622 这种访问形式会失效,如果存在大量引用,会导致工作量大、难排查的问题
IIS配置里删除应用的旧绑定端口(6622),新增一个端口(6500)用于Nginx代理目标
tips: IIS里6500端口可以不配置证书,使用Nginx中配置的证书。
通过Nginx监听原先端口,配置SSL证书文件,利用Nginx自带的497状态,将HTTP访问升级至HTTPS访问
配置文件:
1 | server { |
参考:
https://stackoverflow.com/questions/16669773/nginx-reverse-proxy-to-backend-running-on-localhost
https://blog.csdn.net/faye0412/article/details/75200607
https://blog.csdn.net/jycjyc/article/details/106191981
https://blog.csdn.net/qq_27745471/article/details/124735251
How to redirect on the same port from http to https with nginx reverse proxy
nginx redirect http to https with custom port server
参考:
https://aboutssl.org/iis-redirection-http-to-https/
https://learn.microsoft.com/en-us/answers/questions/762252/iis-10-redirect-http-to-httpsmysitecom.html
IIS中实现HTTPS的自动跳转
URL 重写模块配置引用
URL Rewrite Module 2.0 Configuration Reference
IIS Server Variables
Oracle创建用户、角色、授权、建表空间
Oracle创建视图(View)
1 |
|
CASCADE参数:
CASCADE
使用 cascade参数可以删除该用户的全部objects。要说明的如下:
如果用户的schema中有表,则在删除表的时候自动删除与该表相关的主键和外键。
如果用户的schema中有表,则在删除表的时候自动删除与该表相关的索引。
删除用户时,用户在其他用户中的objects不会被删除,只会被置为无效。
视图,同义词,存储过程,函数,包;
其他用户建立的基于被删除用户的物化视图不会被删除,只是不能在刷新了。
用户模式下的所有触发器全部被删除
被删除用户建立的其他用户不会被删除
oracle删除当前用户以及当前用户所有表、索引等操作
Oracle中drop user和drop user cascade的区别
1、oracle表和字段是有大小写的区别。oracle默认是大写,如果我们用双引号括起来的就区分大小写,如果没有,系统会自动转成大写。
2、我们在使用navicat使用可视化创建数据库时候,navicat自动给我们加上了“”
1 | select * from dba_users;--描述数据库的所有用户 |
1 | select * from dba_sys_privs;--描述授予用户和角色的系统权限 |
1 | select * from role_sys_privs; |
1 | select * from dba_tab_privs; |
1 | select * from dba_roles; |
1 | select * from dba_role_privs; |
1 | select * from V$PWFILE_USERS |
1 | select * from dba_sys_privs where grantee='username'; --其中的username即用户名要大写才行。 |
1 | REVOKE CONNECT,RESOURCE FROM chenmh; |
1 | REVOKE CREATE FROM chenmh; |
1 | REVOKE ALL PRIVILEGES ON zhang.person FROM chenmh; |
Update your browser to view this website correctly.&npsb;Update my browser now